A Short History of the Pretzel

Saturday, January 30, 2010

So one of the first things I've been dying to try in my poor man's kitchenaide is soft pretzels.

Pretzels have a long and interesting history.Though no one is quite sure how they originally started making them, they can be traced back to a monastery in Northern France/ Southern Italy where monks used scraps of dough to represent a child's arms folded in prayer. The 3 holes represented the trinity. The monks offered the warm, doughy bribe to children who had memorized their Bible verses and prayers. The monks called it a Pretiola, Latin for little reward. From there, the pretzel transformed into the Italian word, Brachiola, which means little arms.

Pretzels later worked themselves into medieval culture as a quick snack from a vendor. They came to represent good luck, prosperity, and became somewhat of a logo for fairs and festivals.

A legend exists of a young apprentice baker who fell asleep while the pretzels were baking. Woken up to the bellowing from his teacher at ruining them, the young baker tried them. They were crispier, nuttier, and even preserved longer. Fortunately for him the baker ended up loving them, and thus the hard pretzel was born.

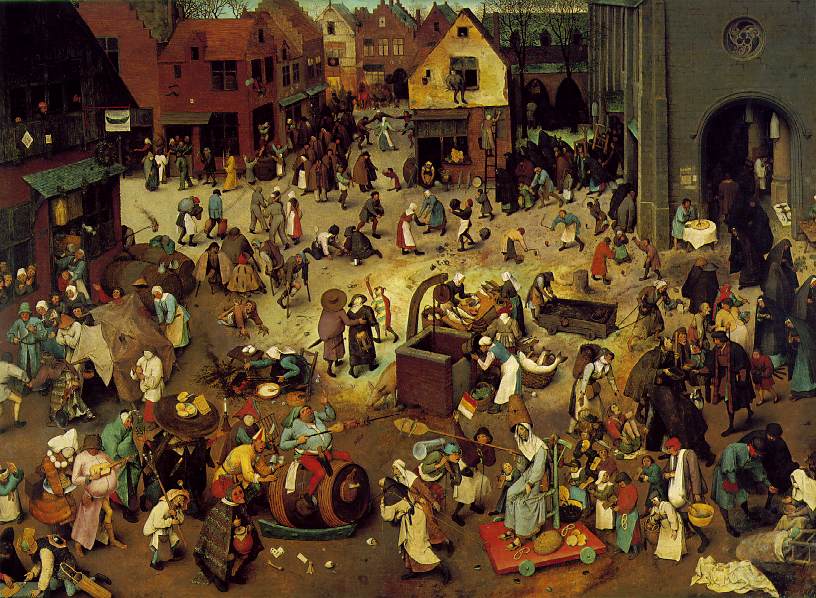
Paintings have even helped us identify pretzels. Check out this reference from The Kitchen Project.  Click on the photo, and then zoom in on your browser of this painting. The painting is by Pieter Bruegel in 1559, and is called "The Fight Between Carnival and Lent." If you zoom in on the lower right corner, you'll find pretzels!


Pretzels have been used at weddings for a long time in Europe as sort of a wishbone. The spouse with the larger half assured their wishes would be fulfilled, and it became a symbol of prosperity. From this the now common phrase "tying the knot" originated.

German's have quite an intricate history with the pretzel.  Pretzels traveled from Europe and quickly adopted the chewy treat. Pretzels began showing up as dinner with two hard-boiled eggs on Good Friday, the day of fasting. the pretzel represented everlasting life, the eggs representing rebirth. Eventually parents began hiding them on Easter morning for their children to find, which led to to the tradition of the Easter Egg hunt.

The German Bavarian pretzel originated by accident as well. A Munich baker named Anton Nepomuk Pfannenbrenner is said to be an employee of a small business that made sweet pretzels. On February 11, 1839 mistook a soda/lye solution for the syrup normally used to coat the pretzels. Amazingly, no one died and it was a delicious mistake! The Bavarian pretzel, with it's thicker brown chewier shiny crust was born!

Skip ahead a little, and pretzels first came to the states with the colonists. Pretzels were first made in the homes. The first commercial pretzel is said to have been made in Lititz, just outside Pennsylvania Dutch country. Their was even a museum there at one point, but sadly it is closed now. Too bad to, I'd love to add it to my list of museums I've visited. Guess the salt and pepper shaker museum will continue to remain top of my list of strange museums for now....

A few other pretzel fun facts....
*Pretzels top some Christmas trees in Austria.
*Some Germans wear pretzels around their neck at new years for good luck.
*Pretzels without salt are called baldies.
*National Soft Pretzel Month is in April.... they have a month for everything now a days ehh?
*Helen Hoff is the world champion pretzel twister, twisting 52 per minute. Wow, that's pretty quick!
*Freepoint, Illinois High School has the pretzel as their mascot. Apparently the town had two major industries, beer and pretzels. Glad they chose the pretzel as the mascot! Go Pretzels!

I had all intentions of making this part of my post about pretzel making, but I didn't realize the long and intricate history of pretzels! Pretzel recipe and pictures to follow on the next edition of the Urbanbreadmachine...

Have a pretzel fun fact? Found another painting with pretzels in it? Have a personal pretzel story? Leave a comment!

Chocolate Walnut Loaf : Sometimes a Girl's Gotta Have Chocolate, Loaf 4

Tuesday, January 26, 2010

So this week I decided to try something a little different. Originally the idea of this was a chocolate chip bread, but I quickly learned that it seems that's fairly impossible in a bread cycle. So this loaf instead became chocolate walnut instead, tahdah!

Our cast of characters:


1 1/3 cups water
2 tablespoons butter or margarine
1 1/2 teaspoons vanilla extract
3 tablespoons sugar (I used Splenda for baking)
1 teaspoon salt
3 1/2 cups all purpose flour
2 teaspoons yeast (I would suggest trying a teaspoon and a half for this loaf!)
1/2 cup walnuts halves
3/4 cup chocolate chips (I prefer Ghirardelli)

First, into the machine went the wet ingredients. My vanilla extract happens to be clear, but you can tell by the lovely smell of vanilla that doesn't transmute over the inter-webs that it is in the pan. As per usual, I used "I can't believe it's not butter" for baking, but you could use plain old butter or margarine. We prefer ICBINB in our house. I chopped the butter roughly to help it distribute in the bread, and let it come to room temperature.


Shortly after that I discovered a fatal error in bread making.


Oh no, almost out of flour! Luckily I had just enough for this loaf through scooping some out of the plastic bag I keep the bag of flower inside, but it was barely enough. How am I suppose to make 52 loaves if I let myself run out of flour? Harrumph! This will need to be fixed soon my dear readers, never you fret.

After that, all the dry ingredients go in except the chocolate chips and the walnuts. I happened to put the splenda straight into the liquid before adding the flour. It made a satisfying fizzle as it dissolved. It looked kind of like the bubbles when you pour lemonlime soda into a clear glass? An oddly strange and satisfying sound. Make a little volcano, and put your yeast in last. Set the machine to the sweet setting, and I set my crust setting to light.


By now, you might be wondering what about the chocolate chips and walnuts? Didn't we forget them? Ah dear reader, it's now time to discover the raisin beep. You may have noticed it before... You set the machine, walk away, and about half an hour later the machine starts beeping all crazy. You wander over to find out what all the crazy beeping is about, yet their seems to be nothing going on other than the dough is finishing kneading. Shrugging your shoulders, you wander away and hopes it doesn't set your kitchen on fire. (Not that I'VE ever done this before).

This strange beeping, dear reader, is the raisin beep. The raisin beep can be used for any ingredient you want distributed throughout the bread, but not pulverized to smithereens. Pretty much anything you put in the machine at the beginning will be kneaded and slammed against the sides of the machines until only crumbs are left. This beep is the right time to add ingredients like raisins, nuts chunks, or chocolate.

So keep your ears open, and when the machine beeps drop in the nuts and the chocolate chips. The second time the machine beeped, the loaf was done, hooray!


This particular loaf rose.... a lot... I was a little concerned that it might pop the top of the bread machine, or get stuck all over my nice see thru window. I would recommend decreasing the amount of yeast to 1 1/2 teaspoons to keep it from going quite so crazy.


The loaf was quite swirled on the bottom.


Swirled on the outside...


Upon slicing it open, I was met with a marbled squishy delight. Though their were no chunks of chocolate, their was a nice chocolate flavor, and the walnuts gave some texture. The bread itself was squishy, not cake like at all, and the vanilla mixed with the chocolate was lovely. I plan on trying it with some peanut butter later this week. Maybe with some banana too... yum! I give this loaf 4 out of 5 loaves.

I'm still waiting for the special loaf to blow my socks off to get 5 loaves.This one was close, but still missing something to push it over the edge...

French Bread Memories- Loaf 3

Wednesday, January 20, 2010

So growing up, my mom had a bread machine. I have fond memories of her making mixes and bagging them into the fridge so we could have quick and simple homemade bread. I remember her experimenting with cornflake bread, and she always cut her butter and put it in the four corners. She says with her machine, it would spread better throughout the bread. My favorite bread she would make was a simple French bread. Somewhat dense, but also springy slathered in a thin layer of butter, warm from the machine... yum...

I called my mom last week for her recipe. She still has her recipes, and was more than happy to share for the cause. Meanwhile in the background my father's warning: You don't want that recipe, it's too good, we ate too much of it and it was bad for us. I agree, eating several loafs of it a week like we did when I was a kid is not good for your health. Which is why I decided to share this recipe with 10 other women, not a bad idea eh?

Below is the recipe I scratched while on the phone to my mother... looks good, no?


 Just in case you didn't get all that.. ha!

1 cup plus 3 tables spoons water
1 tablespoon of butter
3 1/2 cups bread flour
1 1/2 tsp sugar
1 1/4 teaspoon salt
2 teaspoons dry active yeast (1 1/2 teaspoons if bread machine yeast)


So as per all machines, first add your wet ingredients. You might notice in the scribbles about the water it says hot. I was told it needed to be warm, so I thought why don't I pop it in the microwave? I just wrote down hot for my sake....


Then I checked the temperature and realized I may have gotten overzealous. What else do you do with a meat thermometer in a mostly vegetarian household? At least my ground beef would be done, ha!


So after a quick realization, I just let the tap warm up. Silly me. In to the pot went the wet ingredients, and then the dry. If you're keeping up, you might notice the yeast is a little different, I opted for the fleismann's to see how it'd compare and if I could avoid the big bread loaf dents. make yourself a yeast volcano in the dry ingrdients. I prefer the light crust, and I used the regular basic setting on the machine.


The loaf turned out beautifully, without the big dents in the top. May I present, SUPER LOAF! Kinda looks like a cape..


The ladies loved the bread, I made three loaves of it and it made awful good turkey sandwich. Keeping it in plastic will help keep it fresh longer, but the cut edge of the bread will start to go stale within a day or two. I  give this loaf 4 loaves out of 5 for it's versatility, springiness, and overall yummy taste. It would be a 5 if it didn't go stale so easily. Overall a beautiful basic loaf.

Amish Friendship Bread- An Oven Baked Chain Letter of Good Will

Wednesday, January 13, 2010

So I've found as I've started doing more research to try to keep my challenge alive that there are a lot of different types of bread I can make easily by using my bread machine as essentially a poor man's stand mixer. Throw in your ingredients. hit the dough cycle, and then form bread as you would any bread. Not having a kitchenaide mixer myself, I find this idea about the bread machine fascinating.... Especially with how many people I've known who have mixers and don't really know how to use them. Don't get me wrong, a kitchenaide can be a great tool, and they have some awesome attachments. Yet I can make some of the same things by throwing them in my bread machine and let it do the mixing for me? Heck yeah!

So in the coming weeks in between loaves, I think I might experiment with a few of these recipes. I think for the time being, I'm not going to count them towards my 52 loaves as they're not cooked in the breadmachine itself, and that means more dishes in a home without a dishwasher. Stay tuned for more of these....


In the meantime, until we get to next weeks loaf (Which happens to be mixing as we speak. In the room right now it's a combination of bread machine grumbles and the sound of the boy playing Super Hula Hoop) I thought I'd share another creation with you called the Amish Friendship loaf.

The starter was passed to me by my neighbors who with all the best intentions passed it along. The first clue was that the recipe included a box of jello pudding mix. "I don't know what's amish about jello pudding, but it should be tasty" my neighbor said with a smile. Sounds like fun, I'll give it a try.

For 10 days I followed the recipe for the starter. I mushed the bag... mushed the bag... etc. Day 10 came along, baking day! Whoo hoo, a Sunday to boot!

I started reading the recipe... milk... oil..vanilla.... a CUP of sugar? What bread has a CUP of sugar? A sweet bread, that's what! I think we might call this cake dear friend!

Well I'm already elbow deep in it...and we have all the ingredients... and I've been mushing the bag in anticipation for 10 days... and I already made a HUGE mess portioning out the starter into portions. The recipe claimed not to use metal anything... In hindsight I should have said that's a load of phoey, but instead I mixed it up in my pretty glass salad bowl... I felt like a fool mixing it in my glass salad bowl, but I did. Don't judge, you would have too!

So I finished the recipe... wait, 2 loaves? How much does this make? I only have one loaf pan! So I carefully dusted the pan with more cinnamon sugar, split the dough, more cinnamon sugar on top, and baked.

It.... smelled... heavenly. I think I gained 10 pounds just smelling it. One taste and I quickly realized it was very tasty, and there was no way I could keep it in the house and keep my other new years resolutions of trying to eat more in moderation. (Yes I realize a bread blog resolution and an eat in moderation resolution may be just a wee bit contradictory.)  So I packaged up a loaf and took it to friends, and the other loaf was sliced and taken to work.... and somehow I managed to only eat one piece. (score, kept both of my new years resolutions! 21 days to make a habit, bam!)

The folks at work seemed to enjoy it, I got several compliments on it. I assume the friends did as well...So if you're looking for a really sweet breakfast cake... or just to torment your friends with lots of cake and a smidgen of guilt you've found your recipe.

Amish Cinnamon Friendship Bread
Important Tips:
  • Do not use a metal bowl or spoon for mixing (see my note about this below)
  • Do not refrigerate.
  • It is normal for batter to thicken, bubble, or ferment
  • You may need to open the bag to release some of the gas
Day 1: You receive the fermented batter in a 1 gallon ziploc bag. Do Nothing. Just place the bag on the kitchen counter.
Day 2: Squeeze the bag several times.
Day 3: Squeeze the bag several times.
Day 4: Add 1 c. of flour, 1 c. of sugar, 1 c. of milk. Squeeze bag.
Day 5: Squeeze the bag several times.
Day 6: Add 1 c. each flour, sugar, and milk. Squeeze bag.
Day 7: Squeeze bag several times.
Day 8: Squeeze bag several times.
Day 9: Squeeze bag several times.
Day 10: In a large, non-metal bowl, combine batter with 1 c. each flour, sugar, and milk. Mix with a wooden spoon. Pour four 1-cup starters into individual gallon ziploc bags. Give away starters to friends with this set of directions. It is important to follow this sequence exactly.
To the remaining batter add:
  • 1 c. canola oil
  • 1 c. sugar
  • 1 t. vanilla
  • 3 eggs
  • 1 1/2 t. baking powder
  • 1 t. salt
  • 2 c. flour
  • 1/2 c. milk
  • 1/2 t. baking soda
  • 1 large box of instant vanilla pudding
  • 2 t. cinnamon
In separate bowl, mix 1 t. cinnamon and 3 T. sugar. Sprinkle into well-greased loaf pans and coat the sides with sugar mixture. Bake at 350° for 1 hour or until done.


To add to the mystic, the paper claimed only the amish know the deep dark secret to making this starter. Some internet research confirms that's phooey. If you'd like to make your own starter simply imply put 1 c. flour, 1 c. sugar, 1 c. milk, and 1 T. yeast in a gallon ziploc bag and let it sit on the counter. Call that day 1, and you’re good to go.

I apologize I took no pictures of this bread. If you'd like to see what it looked like check out a version of Amish Friendship Bread here. 'Cept that one got a little fancy and included raisins... which I now wish I had done.

Pumpkin and Sunflower Seed- loaf 2

Monday, January 11, 2010

Well this proved to be an interesting loaf... I've made this one before several times, but when I went to make it for my weekly challenge, something didn't come out quite right.  I don't get it normally, this is a great recipe. I suspect I might need a different type of yeast, as I've changed to my bulk jar off brand kind from the farmer's market instead of the packets I had laying around.


Oh course this happens on the week where I'm not just making 1 loaf, I'm making 3. I intended to have 10 hungry women to feed on Friday, and had planned on turky sandwiches on fresh homemade bread. Unfortunatly the ice in Atlanta had different ideas, so now I need those three loafs... for next week. At least I hadn't bought the lunch meat yet.


Here's the recipe for a normally pretty tasty loaf, that was only moderately tasty this time.


Pumpkin and Sunflower Seed Loaf


1 1/4 cups warm water
2 tbsp. liquid honey
2 tbsp vegetable oil
1 1/2 tsp. salt
1 cup whole wheat flour
2 cups all-purpose flour
1/4 cup ground flax seeds

1/4 cup pepitas (green pumpkin seeds)
1/8 cup of sunflower seeds without hulls
2 tsp. (10 ml) quick-rise (instant) dry yeast


First all of the liquid ingredients go in the container. Pretty huh?


Honey can be messy to measure, but sugar content I'm told has great affect on bread so it is best ot measure it. If you have a recipe that uses both oil and honey, measure the oil first, and then in the same measurement spoon without rinsing, measure the honey. The honey then plops out without sticking to the spoon. I can usually get 2 tablespoons of honey out of the spoon easily per every one spoon of oil, so if you're using a recipe with a lot of honey, you could space out the oil inbetween spoonfulls.


Next come all the dry ingredients. I used more of a half and half with the wheat flour so the bread isn't as heavy. I've heard vital wheat gluten added can help make pure whole wheat bread less heavy, I may have to give that a try. The whole grains are healthier than the bleached flour.


After that it's time to start adding crunchy stuff. You can very the seeds to your liking. The you really can't start tasting the flax seed until you add it in very large amounts. Flax seed gives a nutty texture. You can purchase flax seed whole and grind it in your food processor. Unground flax seed passes through the body without the body absorbing the nutrients, so it's best to grind it.


Green pumpkin seeds or pepitas as they are called give nice bits of crunch to this bread. Pepitas are essentially hulled regular pumpkin seeds. I'm a big fan of sprinkling them on salads or adding them to trail mix for a yummy crunch. Also yummy on steamed vegtables in any recipee you'd add nuts to, and you can even make pesto aout of them subbing them for pine nuts. They have a lot of health benifits in moderation, including protecting men's bone strenth, anti-inflamatory for arthritus, and lowering cholestrol.


Lastly, make yourself a volcano for the yeast. Maybe it was the yeast, maybe it was that I tried to make the loaf on the delay setting, but something just didn't work out as well this time. The Friday loaf was much shorter and denser, take a look, same reciepe and machine. I've also got to figure out how to make loaf without lal the bumps on the top. Hrmmm...


So Wednesday night I baked a loaf, Thursday night I delayed a loaf until morning. Friday I got up, took it out, exclaimed so exclamatives that it didn't look as tasty as others I've made, and then decided that maybe it would be best of have some more Rosemary Loaf on hand. The boy courageously braved the icy driveway to pick more rosemary.... that was also covered in snow and ice, but still alive. Since when do we have snow that sticks around in Atlanta?


Shortly after the bread machine started cranking the Rosemary loaf, we canceled the meeting I needed 3 loaves for in the first place. So the boy and I ate fresh rosemary loaf when it came out for Linner (lunch/dinner) and the neighbors birds had a feast with the stubby loaf.


I give the pumpkin and sunflower seed loaf 3 loaves. It's normally good, I just don't know what happened. Anyone else have any ideas? Did yours come out good when you tried this recipe? Is it my yeast?

Happy New Year! - Rosemary Loaf

Sunday, January 3, 2010

We have some friends coming over to celebrate the new year, and I happen to have some very yummy Trader Joe's Spinach dip on hand. What could be better with that than fresh bread?

I decided for my first loaf to go with something that's been tested a little bit more than the loaf of white bread from the Oster Bread Manual. I also felt like making something that seemed a little fancier than white bread. That's when I stumbled upon Jo's Rosemary Bread by Jo Lager. 657 people had rated the recipe, and it had 5 out of 5 stars, it couldn't be bad right? We'll see if it gets 5 loaves.

Jo' Rosemary Bread on All Recipes

1/2 cup water
1/2 cup milk
3 tablespoons of olive oil

1 1/2 teaspoons of sugar
1 teaspoon of salt
1/4 teaspoon of italian seasoning
1/4 teaspoon of ground pepper
1 tablespoon fresh rosemary
2 1/2 cups of bread flour
1 1/2 teaspoons dry active yeast


I was elated to use some fresh rosemary. We have a little plant growing in our garden. Being January, it's one of maybe two plants that is still surviving in the garden.

From the reviews on the recipe, some said it was too salty, so I did reduce that a little bit. I also cut the water half an dhalf with milk, as my last recipe without any fat it in came out miserably.

First I combined all the wet ingredients. Oil always looks so strange floating on milk doesn't it?


Ok, after that it's time for the dry ingredients. Make sure you level off the flour with a knife, and spoon it into the measuring cup with a spoon. Now clean up the flour you dropped on the floor and counter, leveling the flour.


Add your herbs on top of the flour. Don't forget the fresh Rosemary. Maybe you skipped outside to cut some fresh rosemary too. Maybe you almost got hit by the neighbor backing out of the driveway on your quest for Rosemary. Don't do that part.


Add all your spices. Dig a little hole in the top of the flour for the yeast to sit in. It looks like a volcano, doesn't it? A yeast volcano... Then go back and grab the pepper mill because you added all the spices so far, except pepper. At least you remembered this time unlike the milk fiasco.


Set the machine to the regular bread setting, and the light crust because you're particular, and press start. Stare through the hole, then clean up the rest of the mess you just made, and keep your fingers crossed that this one works for company.


Ta-dah! Not too shabby! This bread has a lovely moist springy center, a good crisp outside, lovely aromas of rosemary and you can really taste the olive oil flavor. This loaf didn't last long. The last few pieces the Boy ate New Years day for breakfast while murmuring "I love your new hobby."


The spinach dip which had been skillfully tucked away in the freezer? Missing... Apparently we have a spinach dip thief in our midst. Maybe one of our cats was low on iron, or we ate it and forgot to replenish. After tasting the bread however, I was a little relieved it was missing. The center is light and moist, but probably not durable enough for spinach dip. Serve with good ol' fashioned butter flavor of your choice, or with some slices of warm turkey and spinach for a yum sandwich.

I made a second loaf of this before some friends came over. We were having pizza and video games night, and it was just as tasty the second time around. I even snuck a handful of ground flax seed into it at the last minute. Shhh, don't tell anyone I snuck in an extra handful of healthy. I couldn't even taste it myself, and I was the only one of the four who knew it was there at the time.

I give this loaf a hearty 4 loaves out of 5, loosing one loaf for the fact that it couldn't have possibly held a heaping spoonful of spinach dip as I had planned, and would have made a huge mess if we had tried. It was a nice light Italian flavored loaf. I'm also really glad I cut the salt in my version.It also made a nice piece of toast the next day that was nice and savory.

Happy New Year! Another loaf for the coming week will be posted soon. I have ten hungry women to feed on Friday, I'm thinking sandwiches may be in order and a new type of bread!

Urban Breadmachine Copyright © 2009 Designed by Ipietoon Blogger Template for Bie Blogger Template Vector by DaPino